IoT
OneNET
🧩 Fun Guide to OneNET Blocks (Clu-blocks Pro)
☁️ Important! OneNET blocks let your robot connect to the cloud, send sensor data, and receive commands from anywhere. It’s like giving your robot a walkie-talkie to talk to the internet!
| # | Block | What it does | Dropdown options | What the options mean |
|---|---|---|---|---|
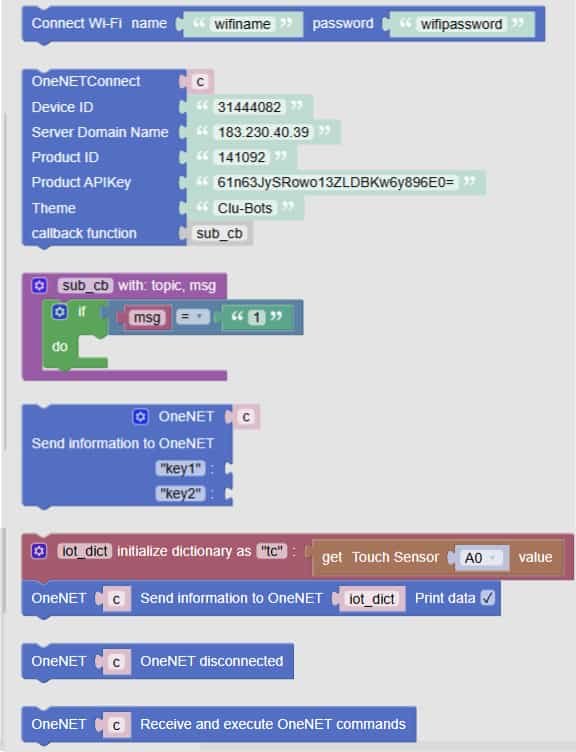
| 1 | Connect Wi-Fi name "wifiname" password "wifipassword" |
Connects your robot to Wi-Fi | — | You enter your network name and password — just like logging in at home |
| 2 | OneNETConnect |
Sets up connection to OneNET | — | You enter Device ID, Server, Product ID, APIKey, Device Name, and a callback function |
| 3 | sub_cb with topic, msg do msg = msg |
Handles messages from OneNET | — | This function runs when your robot receives a message — like “turn on” or “change color” |
| 4 | Send information to OneNET Key: key1 Value: msg |
Sends a single value to OneNET | — | You choose a key name and the value to send — great for sensor readings |
| 5 | iot_dict initialize dictionary as {"tc": get Touch Sensor A0 value} |
Creates a data dictionary | — | You can group multiple sensor values into one package to send |
| 6 | Send information to OneNET Data: iot_dict |
Sends a full dictionary to OneNET | — | Sends all the grouped data at once — like a full status report |
| 7 | OneNET execute |
Starts the OneNET process | — | Needed to keep the connection alive and working — like pressing “start” |
| 8 | Receive and execute OneNET commands |
Listens for commands from the cloud | — | Your robot waits for instructions — like “move forward” or “turn off” |
🧠 Quick Tips for Students
- Always connect to Wi-Fi first — no internet, no cloud!
- Use OneNETConnect to log in to the platform — like signing into your robot’s online account.
- Use keys and dictionaries to send sensor data — you can send one value or a whole bundle.
- Use callback functions to react to messages — like “if message is 1, turn on LED”.
- Use execute and receive to keep your robot synced with the cloud — like a live chat.